
5 Wire Trailer Plug to 4 Wire: A Complete Guide for Easy Wiring
- Understanding the 5 Wire Trailer Plug to 4 Wire Conversion
- Step-by-Step Guide to Wiring a 5 Wire Trailer Plug to 4 Wire
- Common Issues When Converting 5 Wire Trailer Plugs to 4 Wire
- Essential Tools Needed for 5 Wire to 4 Wire Trailer Plug Conversion
- FAQs: Everything You Need to Know About 5 Wire Trailer Plug to 4 Wire
Understanding the 5 Wire Trailer Plug to 4 Wire Conversion
Converting a 5 wire trailer plug to a 4 wire configuration is a common task for many DIY enthusiasts and trailer owners. This conversion is essential when youre dealing with older trailers or vehicles that only support a 4 wire system. Understanding the wiring configuration and the functions of each wire is crucial for a successful conversion, ensuring that your trailer lights and brakes operate correctly.
Wiring Configuration: A standard 5 wire trailer plug typically includes the following connections:
- Ground (White): This wire is connected to the trailer frame and serves as the common ground.
- Left Turn Signal (Yellow): This wire activates the left turn signal lights on the trailer.
- Right Turn Signal (Green): This wire activates the right turn signal lights on the trailer.
- Tail Lights (Brown): This wire powers the tail lights, which illuminate when the vehicles headlights are on.
- Brakes (Blue): This wire is typically used for electric brakes.
When converting to a 4 wire system, you will primarily focus on the essential connections needed for the trailer lights. The 4 wire configuration generally includes the following wires:
- Ground (White): Remains the same, connecting to the trailer frame.
- Left Turn Signal (Yellow): This wire is still required for the left turn signal.
- Right Turn Signal (Green): Necessary for the right turn signal.
- Tail Lights (Brown): This wire is essential for the tail lights.
In this conversion, the electric brakes wire (blue) is often left unconnected since 4 wire systems do not accommodate electric brakes. It’s important to ensure that you properly connect the wires to avoid any electrical issues or malfunctioning lights. By understanding the purpose of each wire and following the correct conversion steps, you can effectively adapt your trailer plug to meet your towing needs.
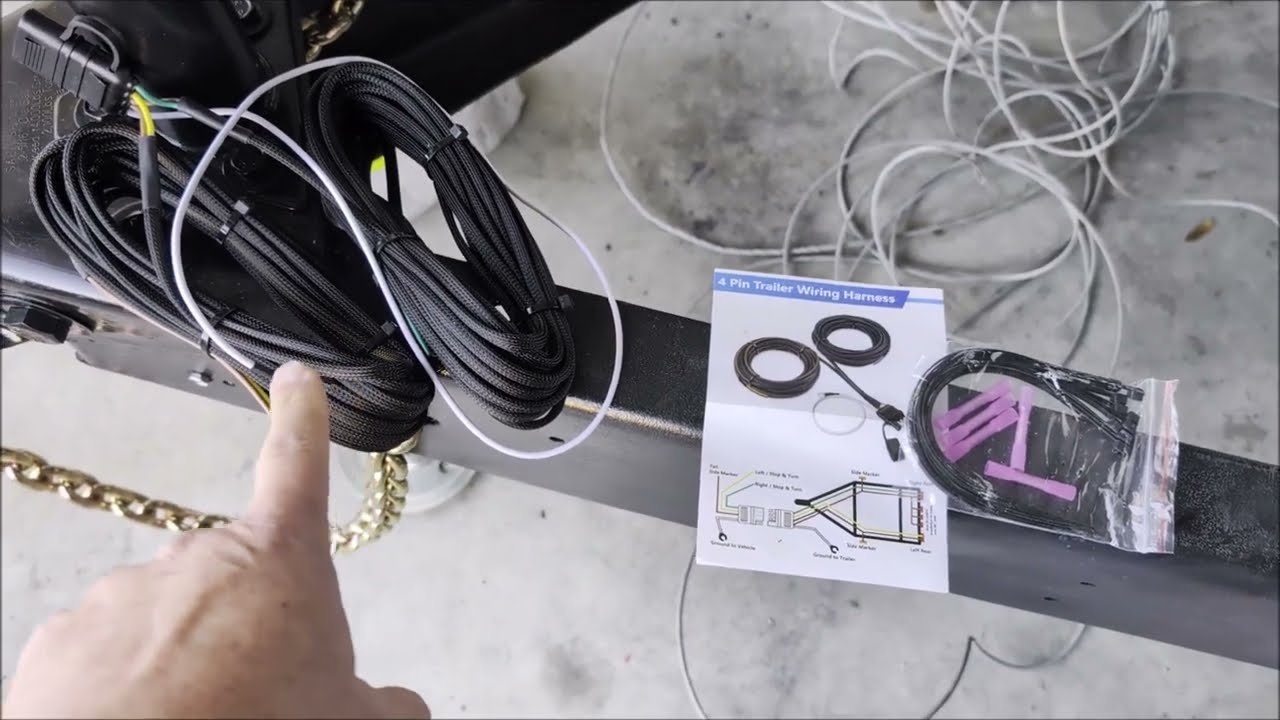
Step-by-Step Guide to Wiring a 5 Wire Trailer Plug to 4 Wire
Wiring a 5 wire trailer plug to a 4 wire system can seem daunting, but with a clear step-by-step approach, it becomes manageable. The key is to understand the function of each wire in both systems. A standard 5 wire trailer plug typically includes the following wires: tail lights, left turn signal, right turn signal, brake lights, and ground. In contrast, a 4 wire system combines the left and right turn signals into a single wire for each side, which means some adjustments are necessary.
Step 1: Gather Your Materials
Before you begin, ensure you have all the necessary tools and materials. You will need:
- 5 wire trailer plug
- 4 wire trailer connector
- Wire strippers
- Electrical tape
- Wire connectors or soldering supplies
Step 2: Identify the Wires
Carefully identify each wire on the 5 wire trailer plug. Typically, the colors are as follows:
- Brown - Tail Lights
- Green - Right Turn Signal
- Yellow - Left Turn Signal
- Red - Brake Lights
- White - Ground
In a 4 wire system, the color coding is generally:
- Brown - Tail Lights
- Green - Right Turn and Brake Lights
- Yellow - Left Turn and Brake Lights
- White - Ground
Step 3: Connect the Wires
Begin connecting the wires from the 5 wire plug to the 4 wire connector. Here’s how:
1. Connect the Brown wire from the 5 wire plug to the Brown wire of the 4 wire connector (Tail Lights).
2. Connect the Green wire from the 5 wire plug to the Green wire of the 4 wire connector (Right Turn Signal and Brake Lights).
3. Connect the Yellow wire from the 5 wire plug to the Yellow wire of the 4 wire connector (Left Turn Signal and Brake Lights).
4. Connect the White wire from the 5 wire plug to the White wire of the 4 wire connector (Ground).
Make sure all connections are secure, using wire connectors or soldering as needed, and wrap them with electrical tape to prevent any short circuits. After completing the wiring, it’s important to test the connections before hitting the road to ensure everything functions correctly.
Common Issues When Converting 5 Wire Trailer Plugs to 4 Wire
Converting a 5 wire trailer plug to a 4 wire system can present several challenges that can affect both functionality and safety. Understanding these common issues can help ensure a successful conversion. One of the primary concerns is the loss of certain lighting functions. In a 5 wire system, additional features such as reverse lights or auxiliary lights may be present, and when converting to a 4 wire setup, these functions can be compromised. This may lead to a lack of visibility while reversing or operating additional lighting features.
Another significant issue arises from wiring mismatches. The color coding of wires in a 5 wire plug does not always align with a 4 wire system. This can lead to confusion during the conversion process, resulting in incorrect connections. For example, the additional wire in a 5 wire setup is often used for the brake lights or turn signals, and failing to correctly identify and connect these wires can lead to malfunctioning lights. It is crucial to double-check wiring diagrams and color codes to avoid these pitfalls.
Additionally, the overall compatibility of the trailer and vehicle must be considered. Some vehicles may have specific electrical requirements that are not met by a standard 4 wire system. This can lead to issues such as blown fuses or a complete failure of the lighting system. It is advisable to consult the vehicles manual or an experienced technician to ensure that the conversion will not cause electrical problems.
Lastly, improper grounding is another common issue that can arise during the conversion process. A 5 wire system typically provides a dedicated ground wire, while a 4 wire system may rely on the trailer frame for grounding. If the frame is not properly grounded, it can lead to flickering lights or complete failure of the lighting system. Ensuring a solid ground connection is essential for the reliable operation of the trailer lights.
Essential Tools Needed for 5 Wire to 4 Wire Trailer Plug Conversion
Converting a 5 wire trailer plug to a 4 wire system can streamline your towing setup and improve compatibility with various trailers. To successfully execute this conversion, having the right tools on hand is essential. Below is a list of the necessary tools you will need to ensure a smooth and efficient process.
Basic Hand Tools
To start, youll need some basic hand tools that are common in most toolboxes. These include:
- Wire Cutters: Essential for cutting the wires to the desired lengths.
- Wire Strippers: Necessary for removing insulation from the ends of the wires to ensure proper connections.
- Crimping Tool: Used to secure the connectors onto the stripped wires, ensuring a solid electrical connection.
- Screwdriver Set: Helpful for removing and securing any screws on the plug or connectors.
Electrical Supplies
In addition to hand tools, youll need some electrical supplies to complete the conversion. These items include:
- Wire Connectors: Choose appropriate connectors that match your wire gauge for reliable connections.
- Electrical Tape: Useful for insulating any exposed wires and preventing short circuits.
- Heat Shrink Tubing: An optional but effective way to protect connections from moisture and wear.
Safety Equipment
Lastly, don’t overlook the importance of safety while performing this conversion. Having the right safety equipment will protect you from potential hazards. Be sure to have:
- Safety Glasses: To shield your eyes from any flying debris while cutting or stripping wires.
- Gloves: To protect your hands from sharp edges and electrical hazards.
By gathering these essential tools and supplies, you’ll be well-equipped to handle the 5 wire to 4 wire trailer plug conversion effectively and safely.
FAQs: Everything You Need to Know About 5 Wire Trailer Plug to 4 Wire
What is a 5 Wire Trailer Plug?
A 5 wire trailer plug is a connector that allows for the electrical connection between a vehicle and a trailer. It typically features five wires that are responsible for various functions, including tail lights, turn signals, and brakes. This type of plug is commonly used for trailers that require more complex lighting and electrical systems, such as those with brakes and additional lighting features.
How Does a 5 Wire Trailer Plug Convert to a 4 Wire System?
Converting a 5 wire trailer plug to a 4 wire system involves a specific wiring configuration. The process typically includes the following steps:
- Identify Wires: Determine which wires in the 5 wire setup correspond to the functions needed for the 4 wire system.
- Connect the Ground: Ensure that the ground wire is properly connected to prevent electrical issues.
- Combine Functions: Some functions, like the brake and turn signals, may need to be combined, depending on the wiring configuration of the trailer.
What Are the Benefits of Using a 5 Wire Plug?
Using a 5 wire trailer plug offers several advantages. Firstly, it allows for additional features such as brake lights, which can enhance safety while towing. Additionally, the extra wiring can support more complex lighting configurations, ensuring that all lights function properly and in sync. This can be particularly important for larger trailers or those used for commercial purposes, where visibility and compliance with regulations are crucial.
Are There Compatibility Issues When Converting?
When converting from a 5 wire to a 4 wire system, compatibility issues can arise. Its essential to ensure that the vehicles electrical system is compatible with the trailers wiring. In some cases, a converter may be required to bridge the gap between the two systems effectively. Always consult the vehicle and trailer manuals or a professional if you are unsure about the conversion process to avoid any electrical malfunctions.
Did you like this content 5 Wire Trailer Plug to 4 Wire: A Complete Guide for Easy Wiring See more here General Mechanics.
Leave a Reply