
New Battery Installed but Light Still On? Troubleshooting Tips
When you install a new battery in your vehicle, the expectation is that the battery light on your dashboard will turn off. However, if the light remains illuminated, it can be perplexing and concerning. Understanding the reasons behind this can help you troubleshoot the issue effectively.
One common reason the battery light stays on even after a battery replacement is an alternator problem. The alternator is responsible for charging the battery while the engine is running. If the alternator is malfunctioning, it may not be providing sufficient charge, causing the battery light to remain on. Signs of a failing alternator include dimming headlights, unusual noises, or electrical issues within the vehicle.
Another possibility is a poor connection at the battery terminals. If the connections are loose or corroded, the electrical current may not flow properly, leading to the battery light staying on. Its essential to inspect the terminals for any signs of corrosion or damage and ensure they are tightly secured. Additionally, check the wiring for any signs of wear or damage that could impact connectivity.
Lastly, it’s crucial to consider that the battery itself might be faulty. Although its new, manufacturing defects can occur. If you suspect this might be the case, its advisable to have the battery tested at an auto parts store or by a professional mechanic. They can assess its performance and confirm whether it’s functioning correctly or needs to be replaced again.
Common Reasons Your New Battery Isnt Resolving the Battery Light Issue
When you install a new battery and the battery light remains illuminated on your dashboard, it can be frustrating and confusing. Several factors might contribute to this issue, and understanding them can help you troubleshoot effectively.
1. Faulty Alternator
One of the most common reasons your new battery isnt solving the battery light issue is a malfunctioning alternator. The alternator is responsible for charging the battery while the engine is running. If it’s not working correctly, your new battery may not be receiving the charge it needs, which can cause the battery light to stay on. Signs of a faulty alternator include dimming headlights and strange noises coming from the engine bay.
2. Poor Battery Connections
Another reason the battery light may remain on is poor connections at the battery terminals. If the terminals are corroded or loose, the electrical connection can be interrupted, preventing the battery from functioning properly. It’s important to inspect the connections and clean any corrosion, ensuring a tight fit.
3. Electrical System Issues
Your vehicle’s electrical system can also cause the battery light to remain illuminated. This can include issues with wiring, fuses, or other components that affect the batterys performance. For instance, a blown fuse in the charging system can lead to the battery light being triggered, even with a new battery installed.
4. Compatibility Issues
Finally, compatibility issues between your vehicle and the new battery may arise. If the battery isn’t the correct type or size for your vehicle, it may not function as intended, leading to ongoing battery light issues. Always ensure that the new battery meets the manufacturer’s specifications for optimal performance.
Identifying the root cause of the persistent battery light can save you time and money, allowing you to address the issue effectively.
Steps to Diagnose a New Battery but Battery Light Still On
When you install a new battery in your vehicle and the battery light remains illuminated on the dashboard, it can be a frustrating experience. This issue may indicate that there are underlying problems that need to be addressed. To effectively diagnose the situation, follow these essential steps.
1. Check Battery Connections
First, ensure that the battery terminals are securely connected. Loose or corroded connections can prevent the battery from functioning correctly. To check:
- Inspect the terminals: Look for any signs of corrosion or damage.
- Tighten the connections: Use a wrench to ensure that the terminals are snug and secure.
If you find corrosion, clean the terminals with a mixture of baking soda and water, and then reattach them securely.
2. Test the Alternator
If the battery connections are solid, the next step is to test the alternator. The alternator is responsible for charging the battery while the engine runs. A malfunctioning alternator can cause the battery light to stay on. You can perform a simple test:
- Start the engine: With the engine running, check the voltage at the battery terminals using a multimeter.
- Look for a reading: A healthy alternator should produce between 13.7 to 14.7 volts.
If the voltage is lower than this range, the alternator may be faulty and require further inspection or replacement.
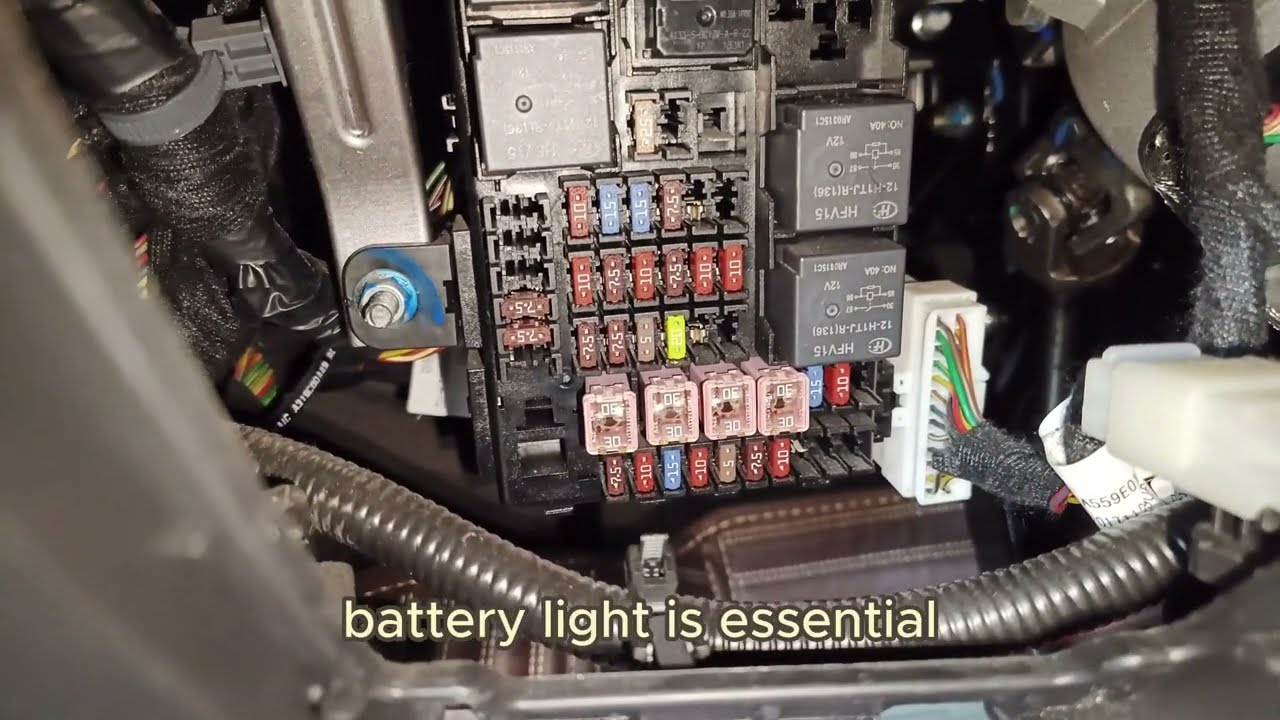
3. Inspect the Fuses
Another critical step is to check the fuses associated with the charging system. A blown fuse can interrupt the flow of electricity and keep the battery light on. Locate the fuse box and:
- Refer to the manual: Use your vehicle’s manual to identify the specific fuses related to the battery and alternator.
- Check for blown fuses: Remove the fuses and inspect them visually or use a multimeter to test for continuity.
Replace any blown fuses and see if this resolves the issue.
By following these diagnostic steps, you can identify the root cause of why the battery light remains on despite having a new battery. Each step helps narrow down potential issues, ensuring that your vehicles electrical system operates smoothly.

How to Fix Battery Light Issues After Installing a New Battery
After installing a new battery, its not uncommon to see the battery light on your dashboard illuminate unexpectedly. This can be concerning, but there are several steps you can take to troubleshoot and resolve the issue.
1. Check Battery Connections
The first step is to ensure that the battery terminals are securely connected. Loose or corroded connections can prevent the battery from functioning properly and trigger the battery light. Start by inspecting the positive and negative terminals for any signs of corrosion or dirt. If necessary, clean the terminals with a mixture of baking soda and water, then securely tighten the connections.
2. Inspect the Alternator
The alternator is responsible for charging the battery while the vehicle is running. If the battery light remains on after replacing the battery, it could indicate an issue with the alternator. To check its functionality, you can use a multimeter to measure the voltage output. A healthy alternator should produce between 13.7 to 14.7 volts. If the output is below this range, it may be time to replace or repair the alternator.
3. Examine Fuses and Wiring
Sometimes, the battery light can be triggered by a blown fuse or damaged wiring. Consult your vehicle’s manual to locate the fuse box and check for any blown fuses related to the charging system. Additionally, inspect the wiring connected to the battery and alternator for any signs of wear or damage. If you find any issues, repairing or replacing the affected components can help resolve the battery light issue.
4. Reset the Car’s Computer
In some cases, the vehicles computer may need to be reset after a new battery installation. Disconnect the battery for about 10 minutes, then reconnect it. This action can clear any error codes and potentially turn off the battery light. If the light persists, a diagnostic scan may be necessary to identify any underlying issues that need to be addressed.
When to Seek Professional Help for a New Battery and Persistent Battery Light
When your vehicles battery light remains illuminated, it can indicate a range of issues that require immediate attention. It is crucial to understand when to seek professional help, as ignoring the warning can lead to further complications. If the battery light appears on your dashboard and does not turn off after starting your car, this could signify a failing battery, a malfunctioning alternator, or other electrical system problems.
Signs That You Should Consult a Professional:
- If the battery light stays on after replacing the battery.
- Frequent jump-starts are needed to get your vehicle running.
- Corrosion is visible on battery terminals.
- Your vehicle experiences electrical issues, such as dimming lights or malfunctioning accessories.
If youve recently installed a new battery and the light persists, this is a strong indication that the issue lies elsewhere, possibly in the charging system. A professional mechanic can conduct a thorough diagnostic check to determine whether the alternator is functioning properly or if there are any wiring problems that need addressing. Ignoring these signs could result in unexpected breakdowns or damage to other electrical components in your vehicle.
Another important factor to consider is the age of your battery. If your battery is over three years old and the light is on, it’s wise to consult with a professional. A mechanic can assess the batterys health and recommend replacement if necessary. Addressing battery issues promptly not only ensures the longevity of your vehicle but also enhances your safety on the road.
Did you like this content New Battery Installed but Light Still On? Troubleshooting Tips See more here General Mechanics.
Leave a Reply